
Category: DIY Decorations
ABCey Presents: 5 Creative Ideas for Upcycled Event Decor!
Whether it’s a small event, a huge conference, or a gala, purchasing or renting event decor can be very wasteful and pricey! ABCey has compiled a list of our favorite ideas for upcycled event decor!
1. Actual Trash (and yes, we mean it!)

Actual trash! You can use thrown-out trash and transform it into a banner of trash bags or a beautiful backdrop for your guests. This one was even from one of our events, Creating Equilibrium – an environmental conference and festival that focused on sustainability! Based on the theme, we designed a depiction of our oceans by upcycling thrown-out trash.
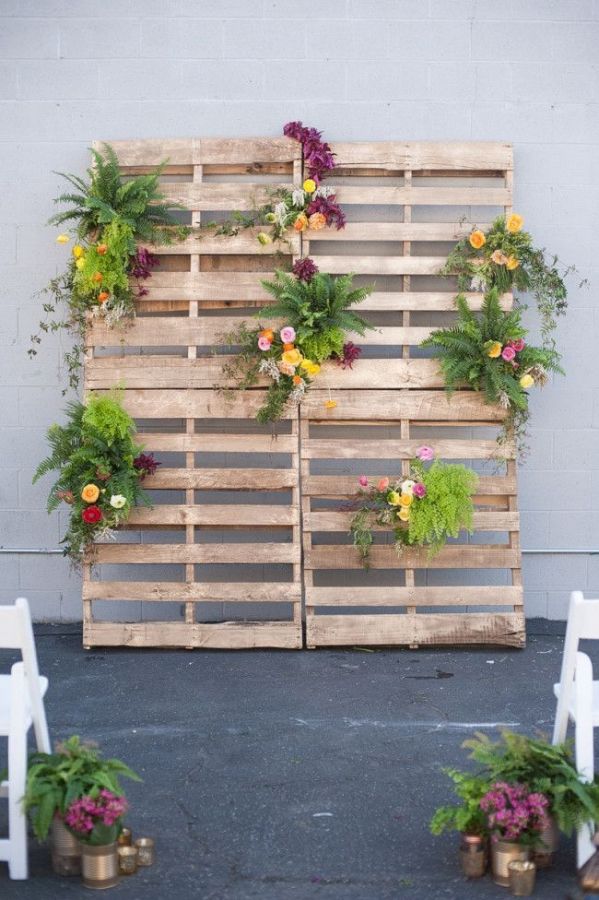
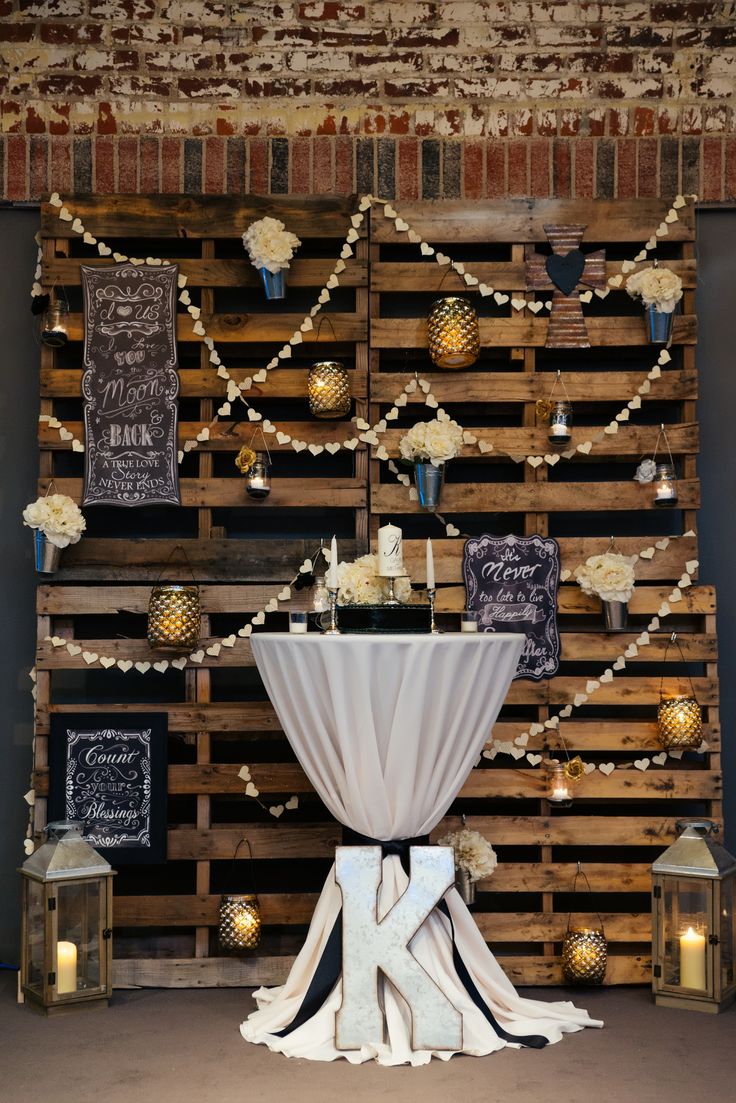
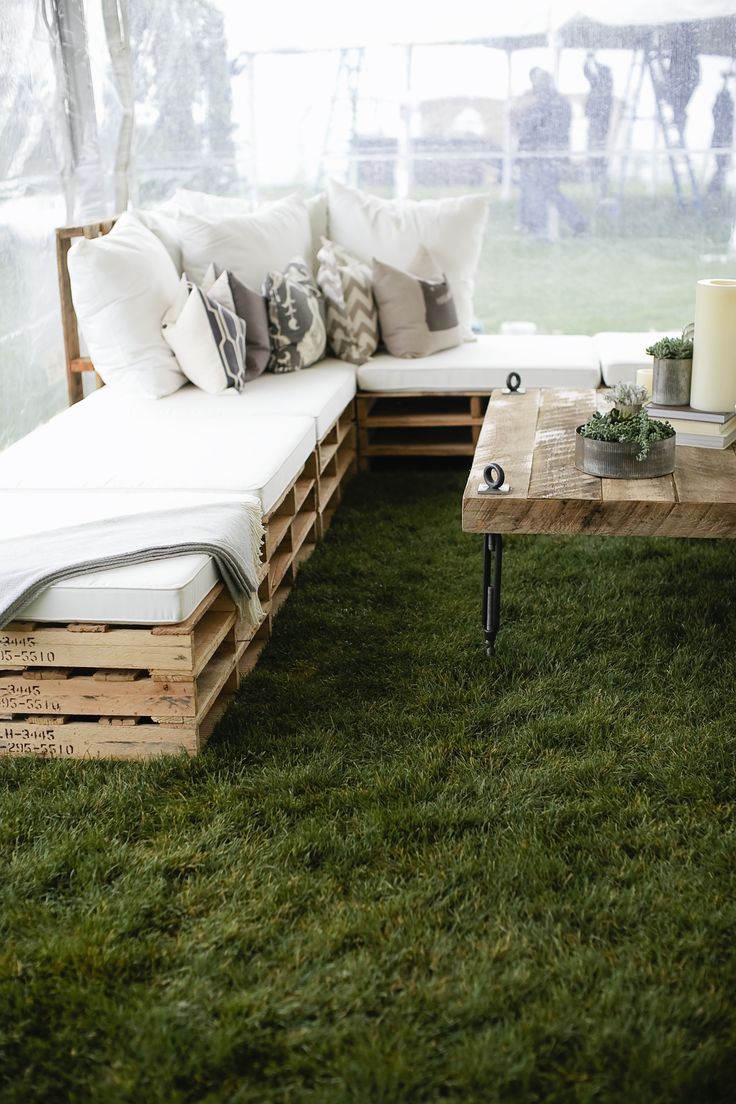
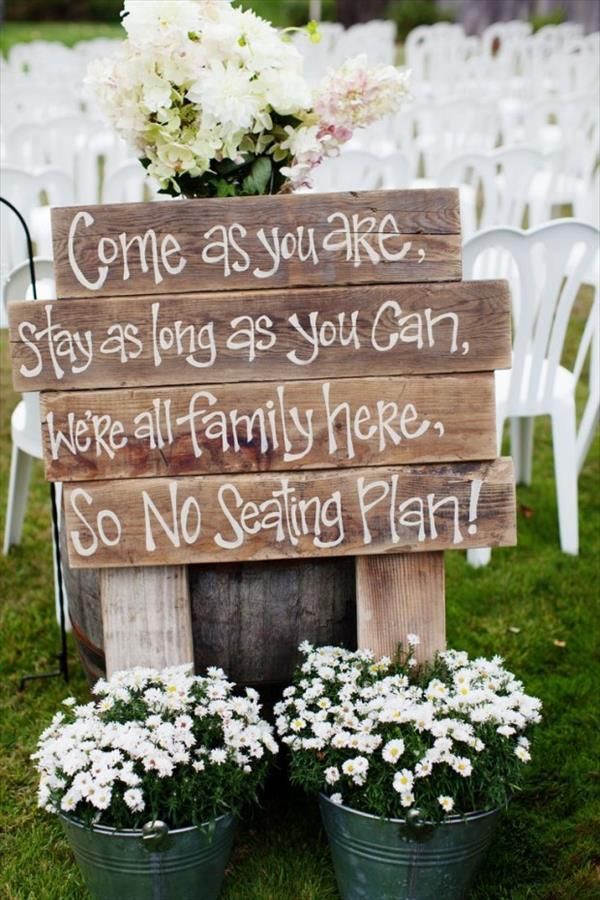
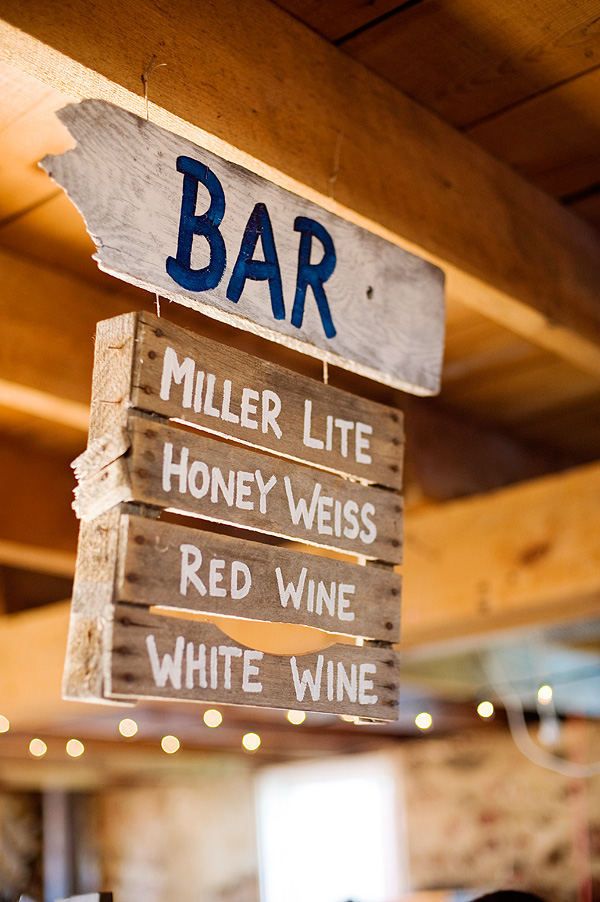
2. Wooden Pallets
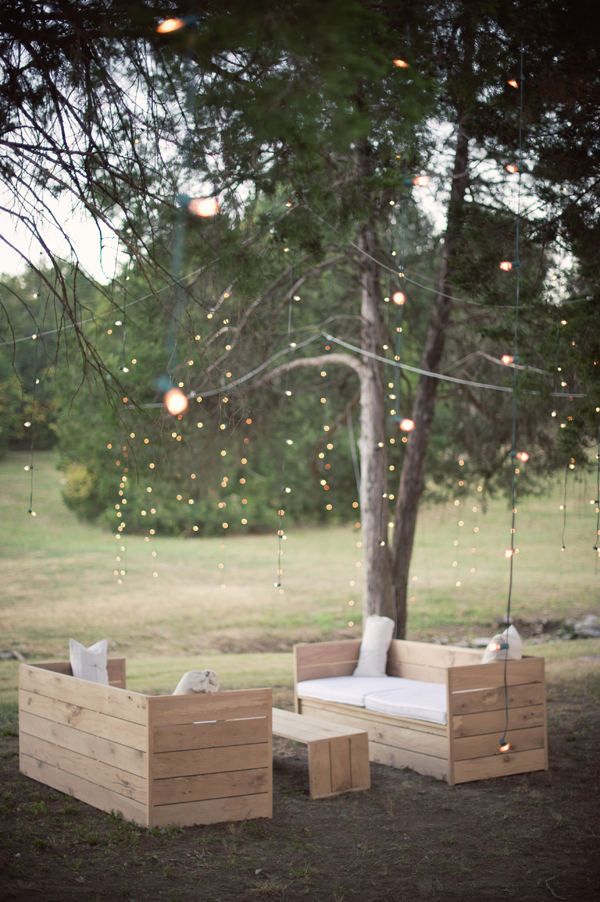
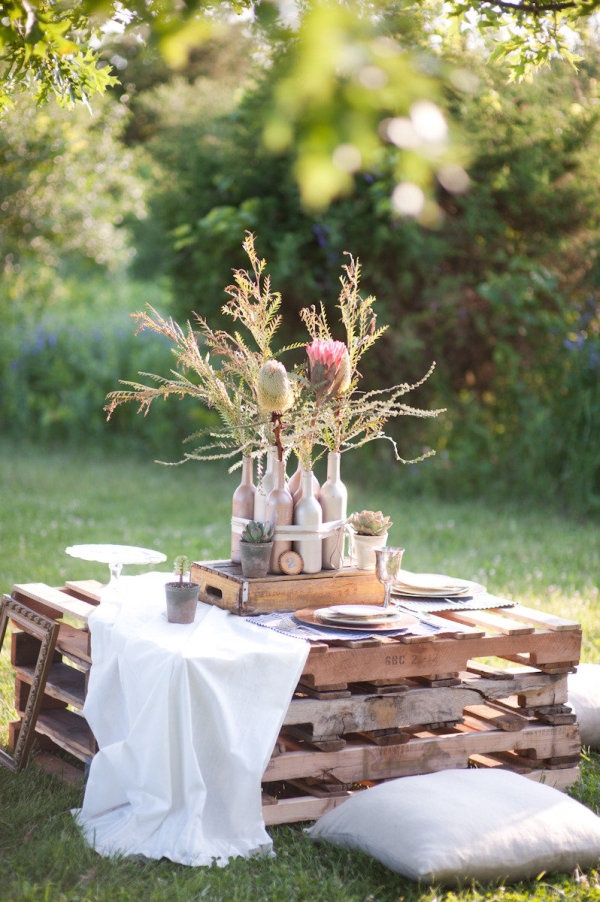
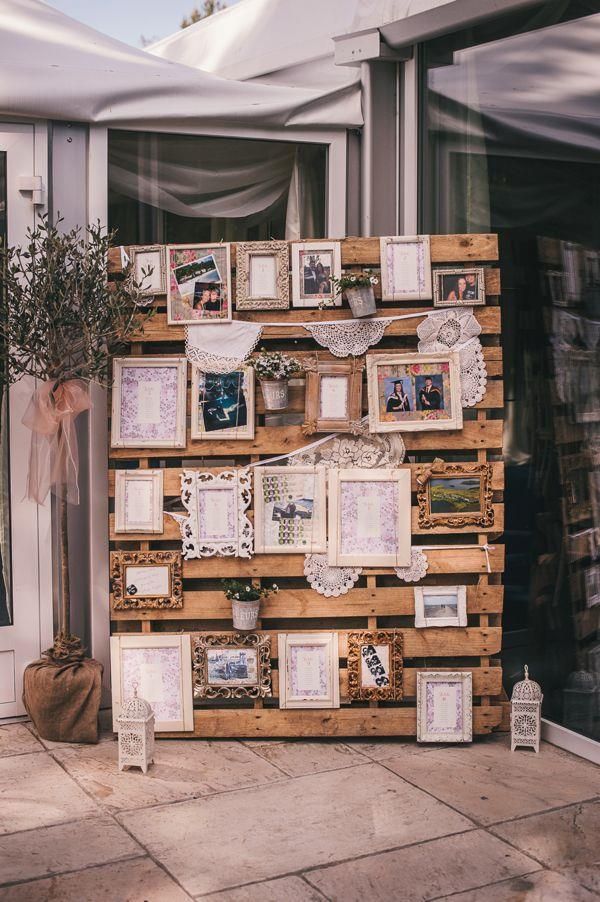
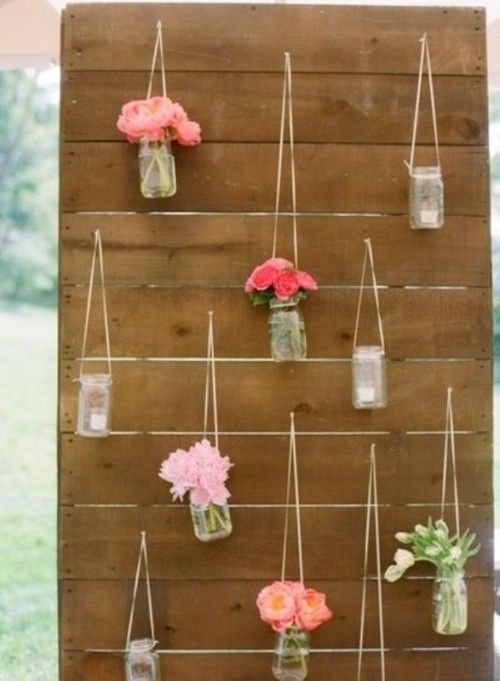
 Wooden pallets are one of the best things to upcycle! It effortlessly adds a natural element to your event and can be transformed into a multitude of things! You can stack them for a makeshift table, hang photos and lights from them, paint them to make signs, and so much more. All it takes is a little imagination..
3. Old Rope and Leftover Boards

With old and sturdy rope and a board, you can create a suspended tabletop for any outdoor event! Dress it up for an elegant party or add some party favors for your guests! If you want add a playful feel for any younger guests or those with young hearts, you can create a swing! It’ll also become a great photo-op for people to remember your event.
4. Hula Hoop

Hula hoops don’t just have to stay around your waist (and sometimes the floor)! With some flowers and greenery, you can completely change your old hula hoop into a chandelier! You can also use it to highlight a statement word you want your guests to remember even after they leave! Cheers!
5. Jars

Jars and bottles are an easy element to upcycle! If you add a little water, you can use them as a vase for florals. Also, you can make it into an activity for your guests with a little paint or twine to let them customize their own! If you are looking to illuminate your event, placing candles or lights inside a jar is a great way add a soft glow!
What is your favorite upcycled event decor?
All these projects can also become a great interactive activity for you and your guests. They’re just as elegant and beautiful as store-bought event decorations. Which ones will you use? Let us know in the comments below or on Facebook or Twitter!
5 DIY Wood Pallets Ideas for Your Wedding
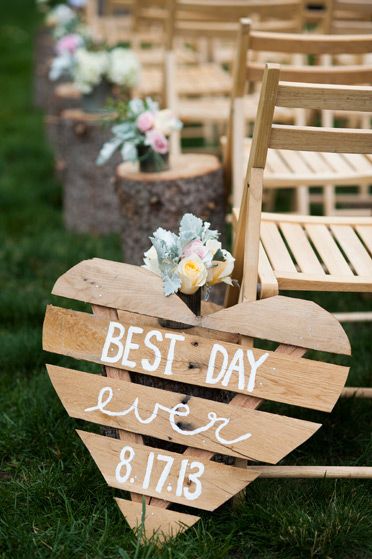
Looking to have a rustic wedding, but don’t want to break the bank? ABCey has compiled 5 great DIY wood pallet ideas fit for a wedding! We love wood pallets because they can be crafted and used in so many different ways, from seating to signage.
1. Event Design
Pallets can be used as a main element of your event design! Set the stage using them as part of your opening ceremony, a backdrop or even a chandelier.


2. Lounge seating
Extra seating at weddings is always a good idea! Build your own benches or couches using wood pallets. Get out those power tools and click here for instructions!
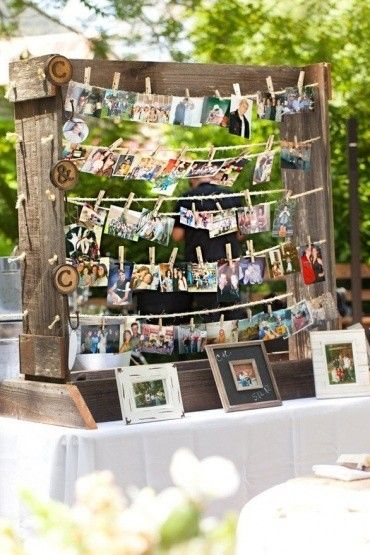
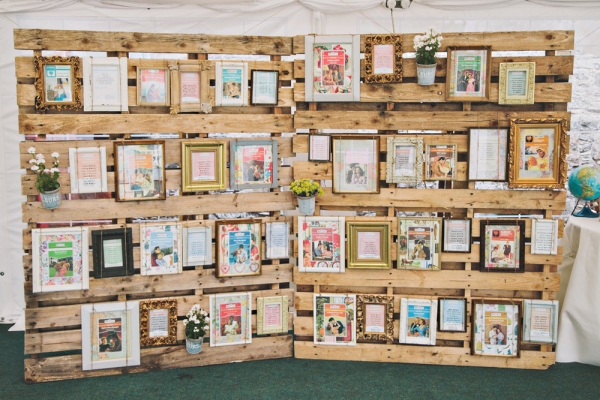
3. Décor
Use pallets as a photo display or even place flowers among them for decoration! Easily hang, drape or pin pictures in the different sections for everyone to admire.
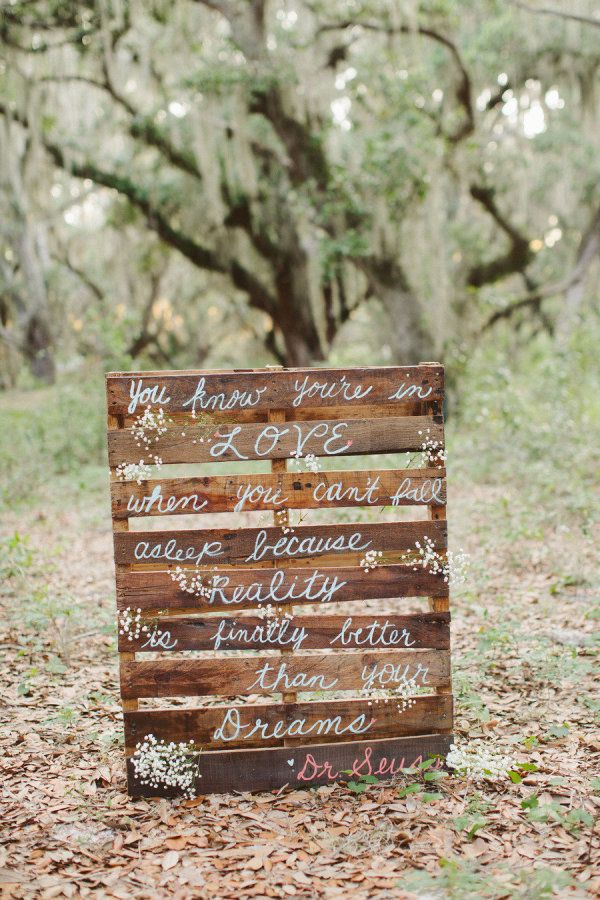
4. Signage
Pallets make for beautiful signs. Paint, stain or cut them however your like. You can write your favorite quotes or give your guests instructions. They are fun to make and look great!
5. Menu
Instead of printing out hundreds of menus for each guest, paint it onto a pallet nice and big. Everyone will be able to see it and it saves the environment!

 Will you be doing one of the DIY pallet projects for your wedding? Let us know with a comment or message us on Facebook or Twitter!
Tech it Up a Notch! 5 DIY Decor Ideas for Your Technology
Tired of your same old smart device accessories? Don’t have the time or money to buy new ones? Have no fear… ABCey has gathered a few ways to tech it up a notch! Spend less time worrying about your devices and more on your events. Here are 5 life hacks to spunk up your technology and save you some cash!
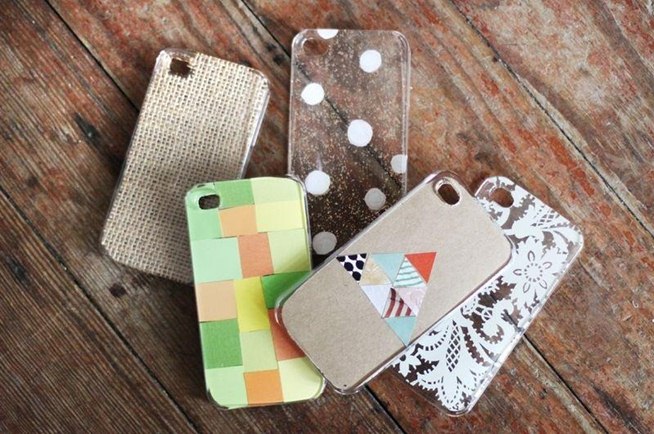
1 . CRAFTY PHONE CASE:
Phones are essential in the events world and keeping them protected is a must! On the go, or in the office, this DIY phone case is sure to make life a little easier. Buy one clear back phone case and let your imagination fly! Simply cut or tape in a design and WAH-LA!
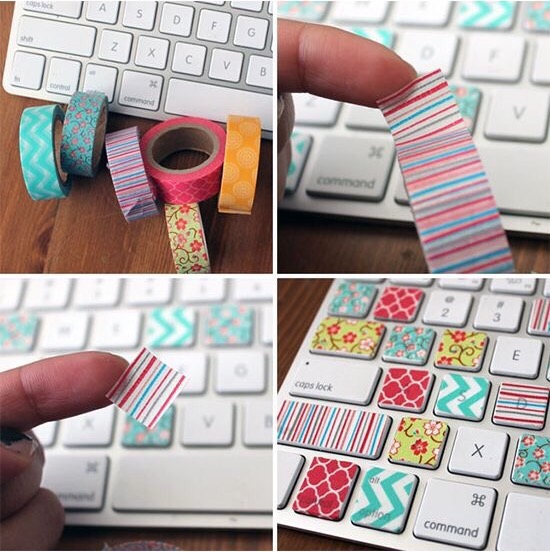
2. WASHI TAPE LAPTOP DECAL:
Planning an event? Staring at your laptop all day? Say goodbye to your dull old keyboard! Pick a few of your favorite washi tape designs at your local supply store and create a cute laptop display. Cut up the different patterns and simply stick them on!
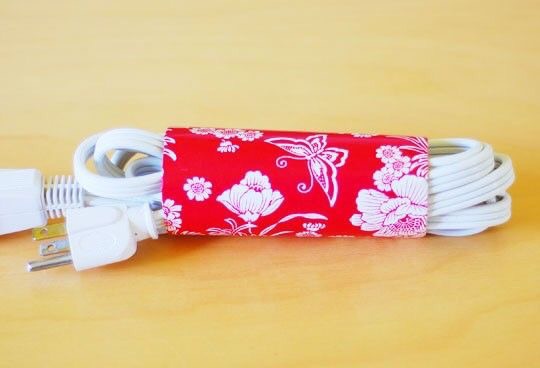
3. TOILET PAPER CORD CASE:
Staying organized for an event is important. Grab a used toilet paper roll, some pretty patterned tape or ribbon, and you have yourself a cord case! No one likes dealing with a bunch of tangles. Decorate a roll and label it as you please. Store away your chargers and cords with style!
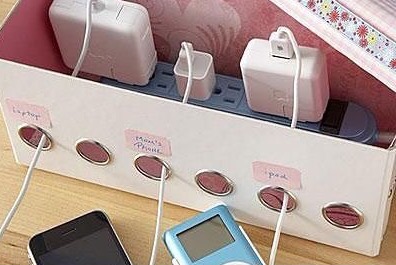
4. CHARGING BOX STATION:
This charging station box is perfect for the audio visual techy! With this DIY your cords will never be an unorganized mess. Grab a box fit for your multi-outlet, cut a few holes, label them according to your charger, and store them easy for your next event.
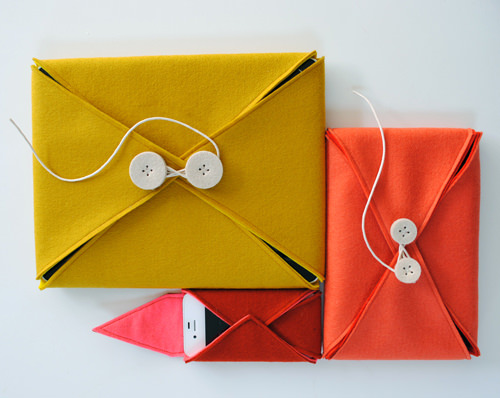
5. FELT SMART DEVICE CASE:
Who would’ve thought that felt would make for a great phone, tablet, or laptop case? Pick your favorite color and create an envelope effect with buttons and string. Make it your own with additional decor. With all the hussle and bussle in a day, you won’t have to worry about the safety of your device!
Bring out your inner craftsman with these 5 easy DIY’s for your smart devices! Which one of these ideas to do like the best? Let us know in the comments below or message us on Twitter or Facebook!
5 DIY Thanksgiving Decor Ideas
With Thanksgiving just around the corner, ABCey cannot wait to celebrate with family and friends! We’ve gathered these 5 DIY Thanksgiving Decor Ideas so you can focus on cooking the turkey without breaking the bank.
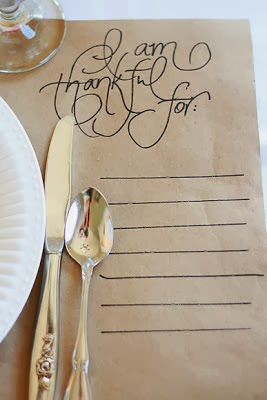
Thankful Placemats
These personalized Thankful Placemats will spice up your table with just two materials: construction paper (or scrapbook paper) and a pen! Let your guests help you with decorating by letting them write what they’re thankful for before dinner begins. It’s a great conversation piece!

Turkey Legs
These Turkey Legs are great for the kids who will be so thankful when they rip open these crafty “turkey legs” to find the hidden candy! All you really need is a brown paper bag, printer paper and some sweets!
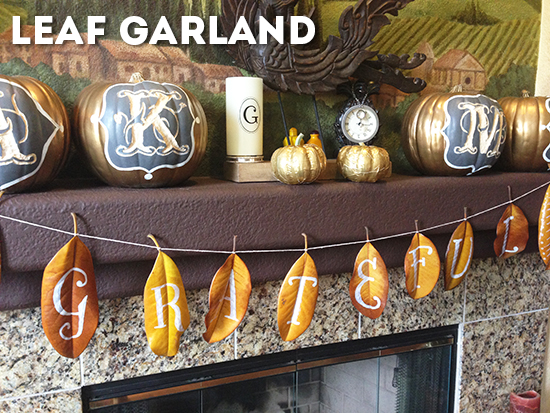
Leaf Garland
Send the kids out to gather some Fall leaves and write whatever word sums up Thanksgiving for you (ex. “grateful,” “thankful,” “family”)! Then use twine to make a Leaf Garland and hang it up for all to see!
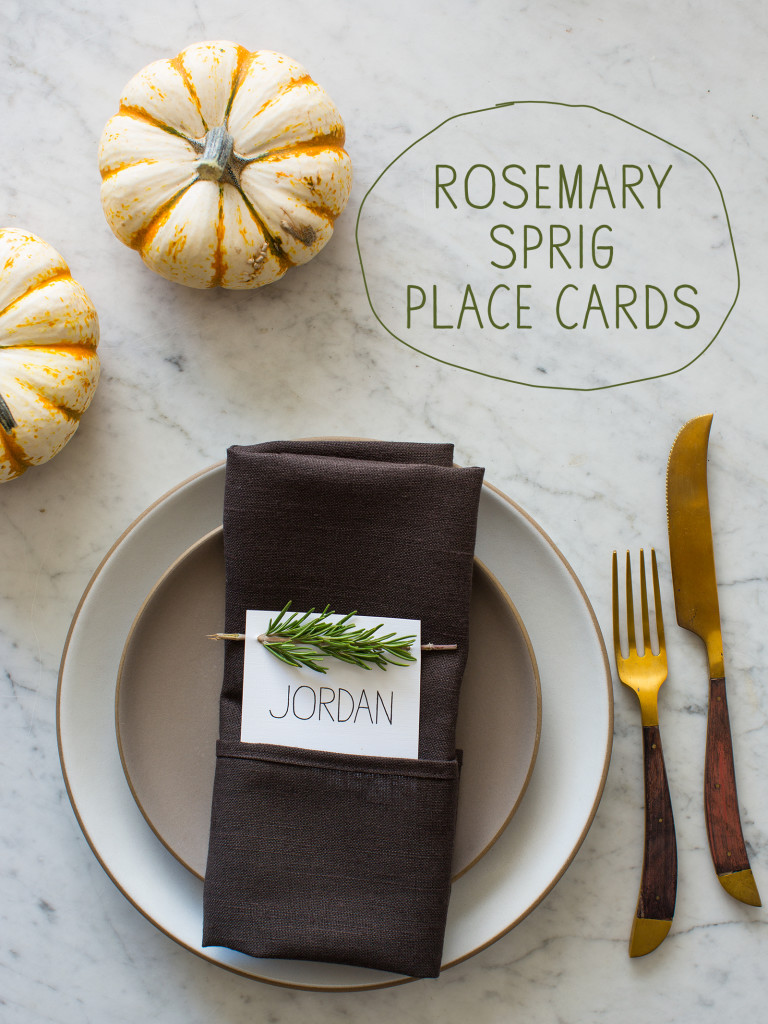
Rosemary Sprig Place Cards
Incorporate natural elements onto your dinner table with these Rosemary Sprig Place Cards! Your family will be reminded to appreciate everything around them. Plus, the sweet Rosemary smell will complement your cooking!
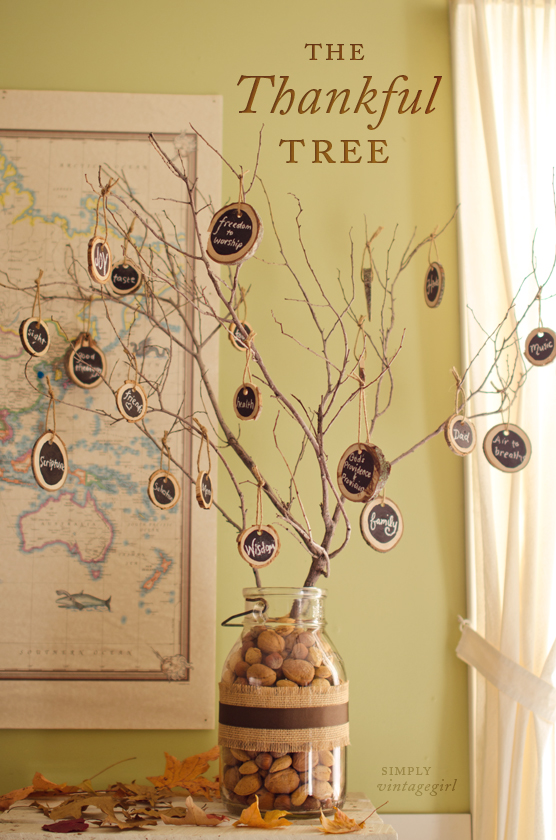
Thankful Tree
While your kids are gathering leaves for the Leaf Garland, have them pick up a fistful of twigs as well! Even though the Thankful Tree requires a couple more materials than our other DIY projects, it’ll be well worth the effort when your family remembers all that they are thankful for with this beautiful tree.

Which of these crafty DIY Thanksgiving Decor Ideas will you be doing for Thanksgiving next week? Let us know in the comments below or on Facebook and Twitter!
DIY: Vintage Marquee Sign
With the summer season now upon us, ABCey is continuing with our DIY creations in full force! This Marquee light up sign can be customized to send any message of your choice to attendees at an event. It is a great decor addition for your room, event, or in our case – a wedding! This DIY project is simple to create and not many materials are needed. Read on for steps on how to create a similar sign!
 Materials:
– 12 inch paper maché block letters
– Globe string lights (ours were purchased online from Target)
– Spray paint
Tools:
– Exacto knife
– Heavy duty duck tape
 Once your materials are in order, start by using the exacto knife to cut out the top of each letter. Remove the top piece and any cardboard supports inside. You can either save this top piece for future projects or recycle it, but we won’t be needing it for this one.
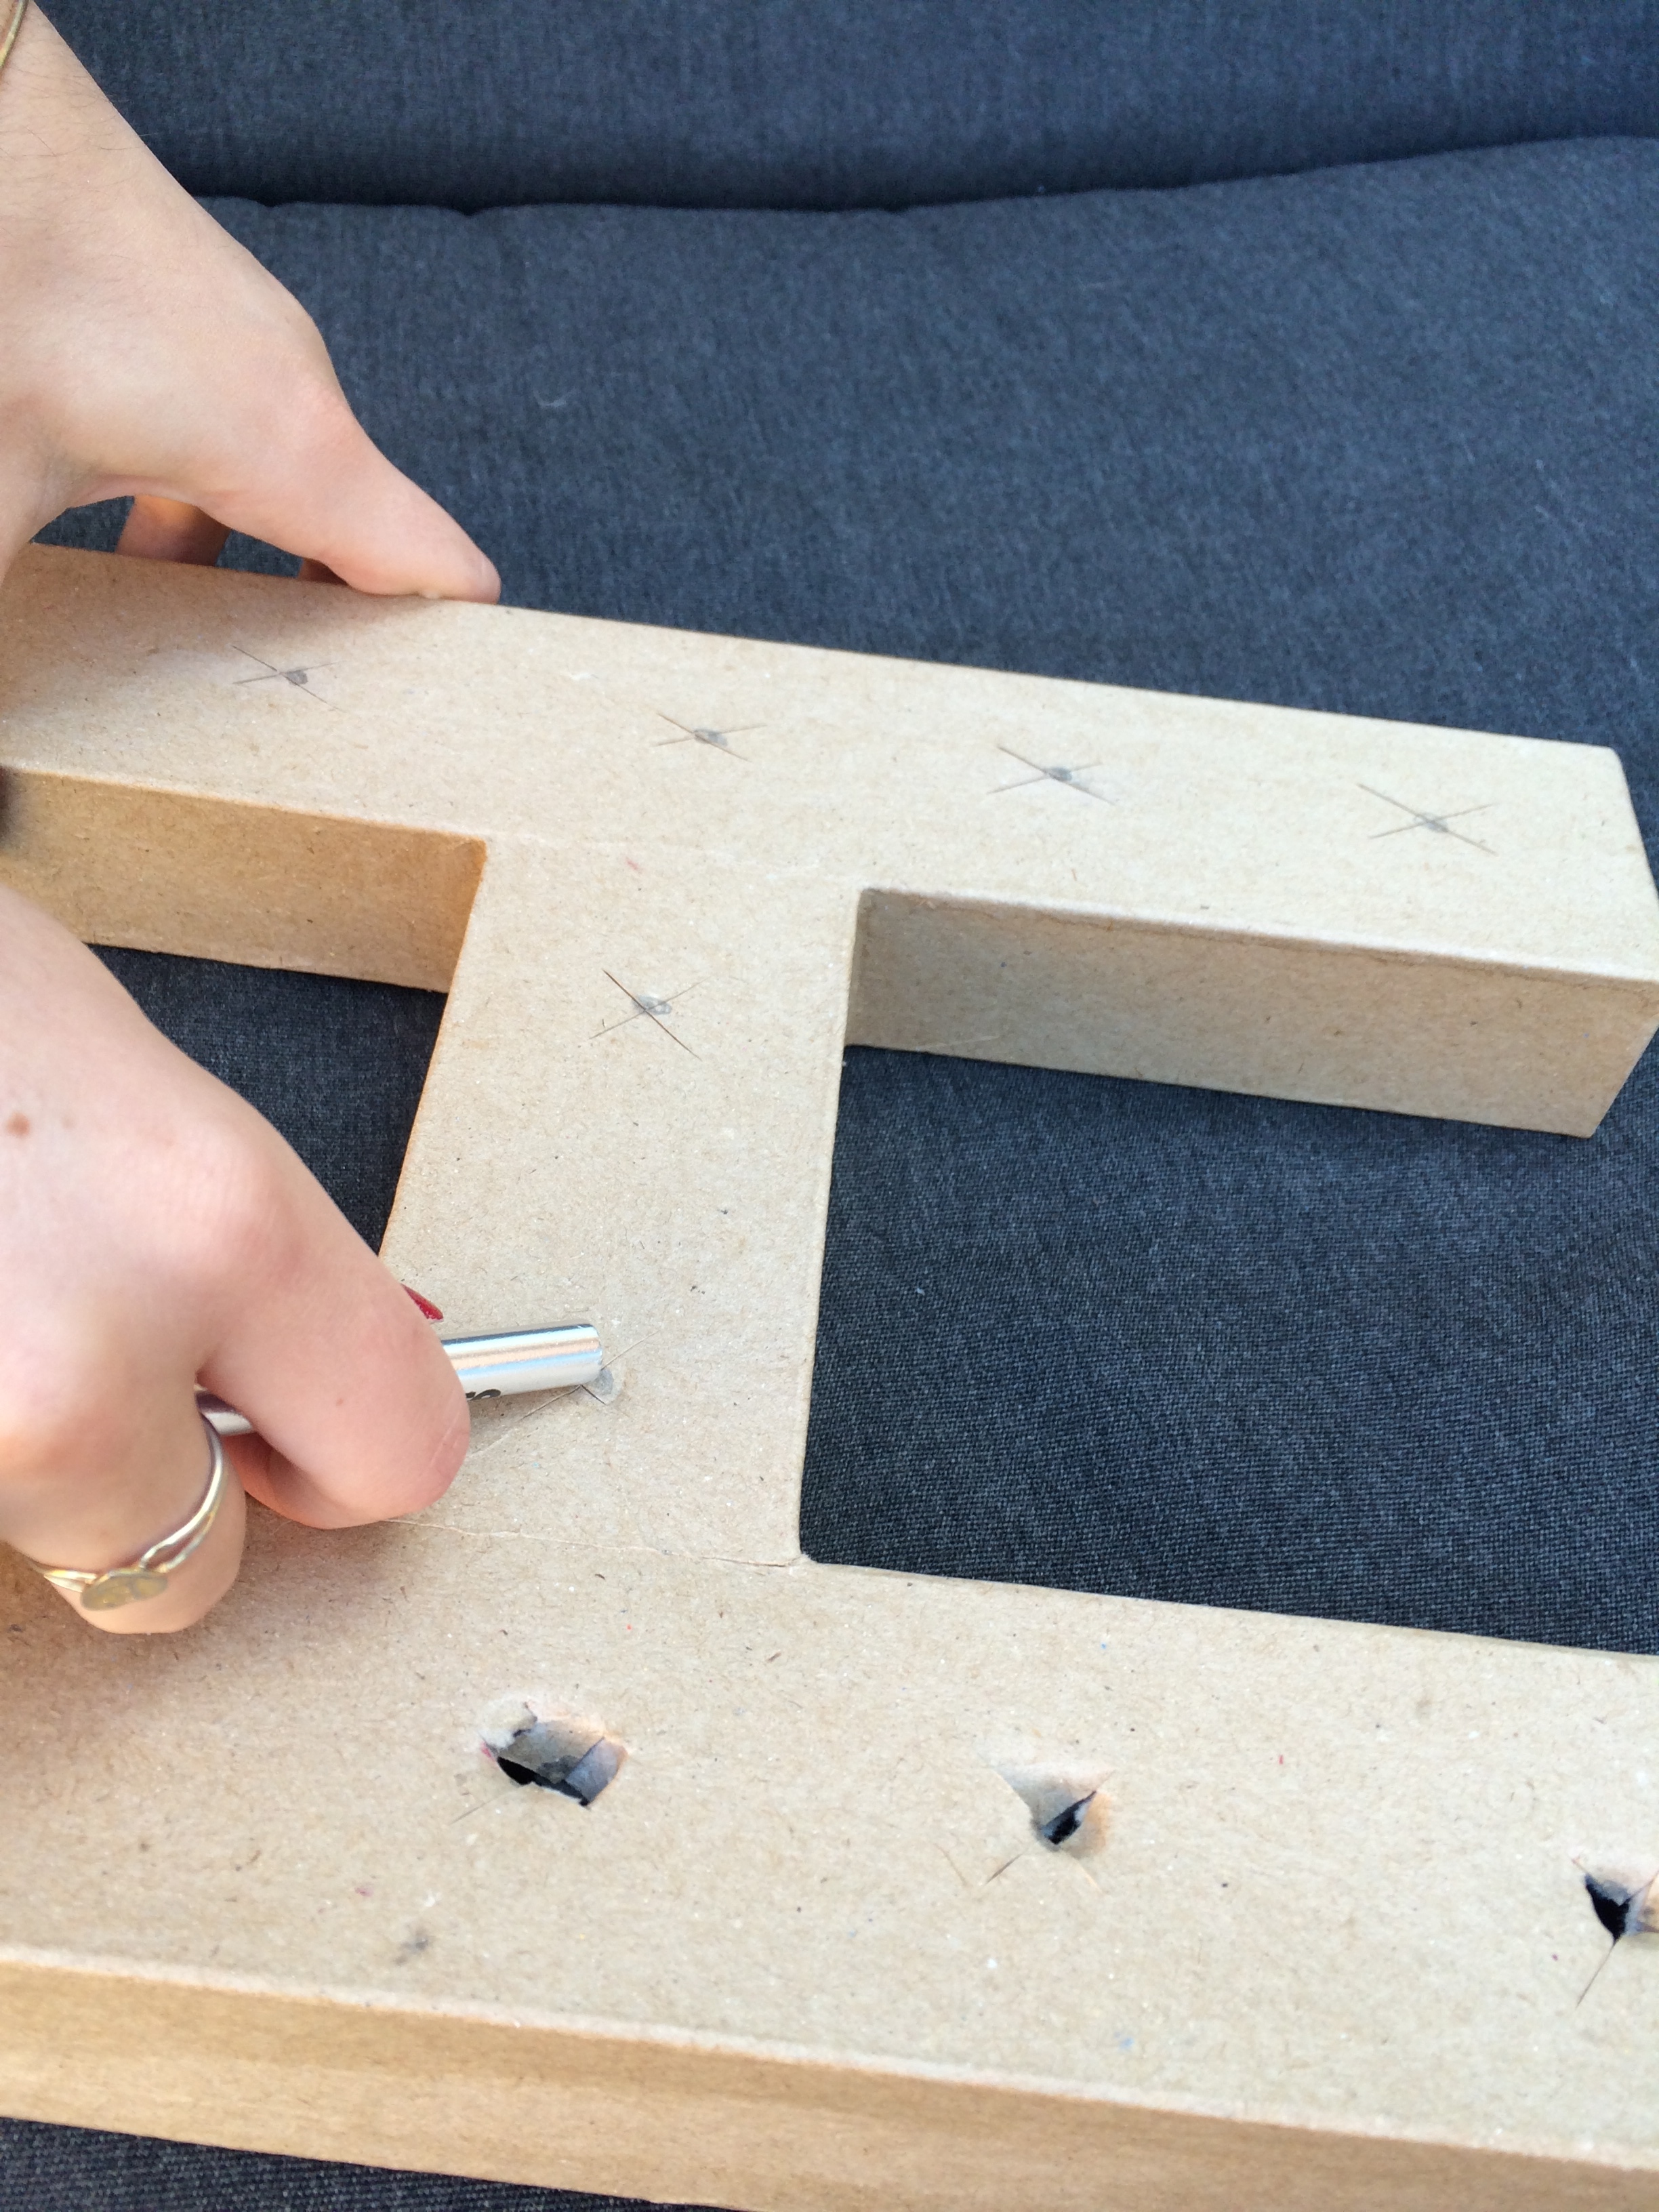 Next up, flip your letters upside down and cut x’s where you want bulbs to go. Then punch out the hole using the dull side of your exacto knife. Repeat this with all your letters.
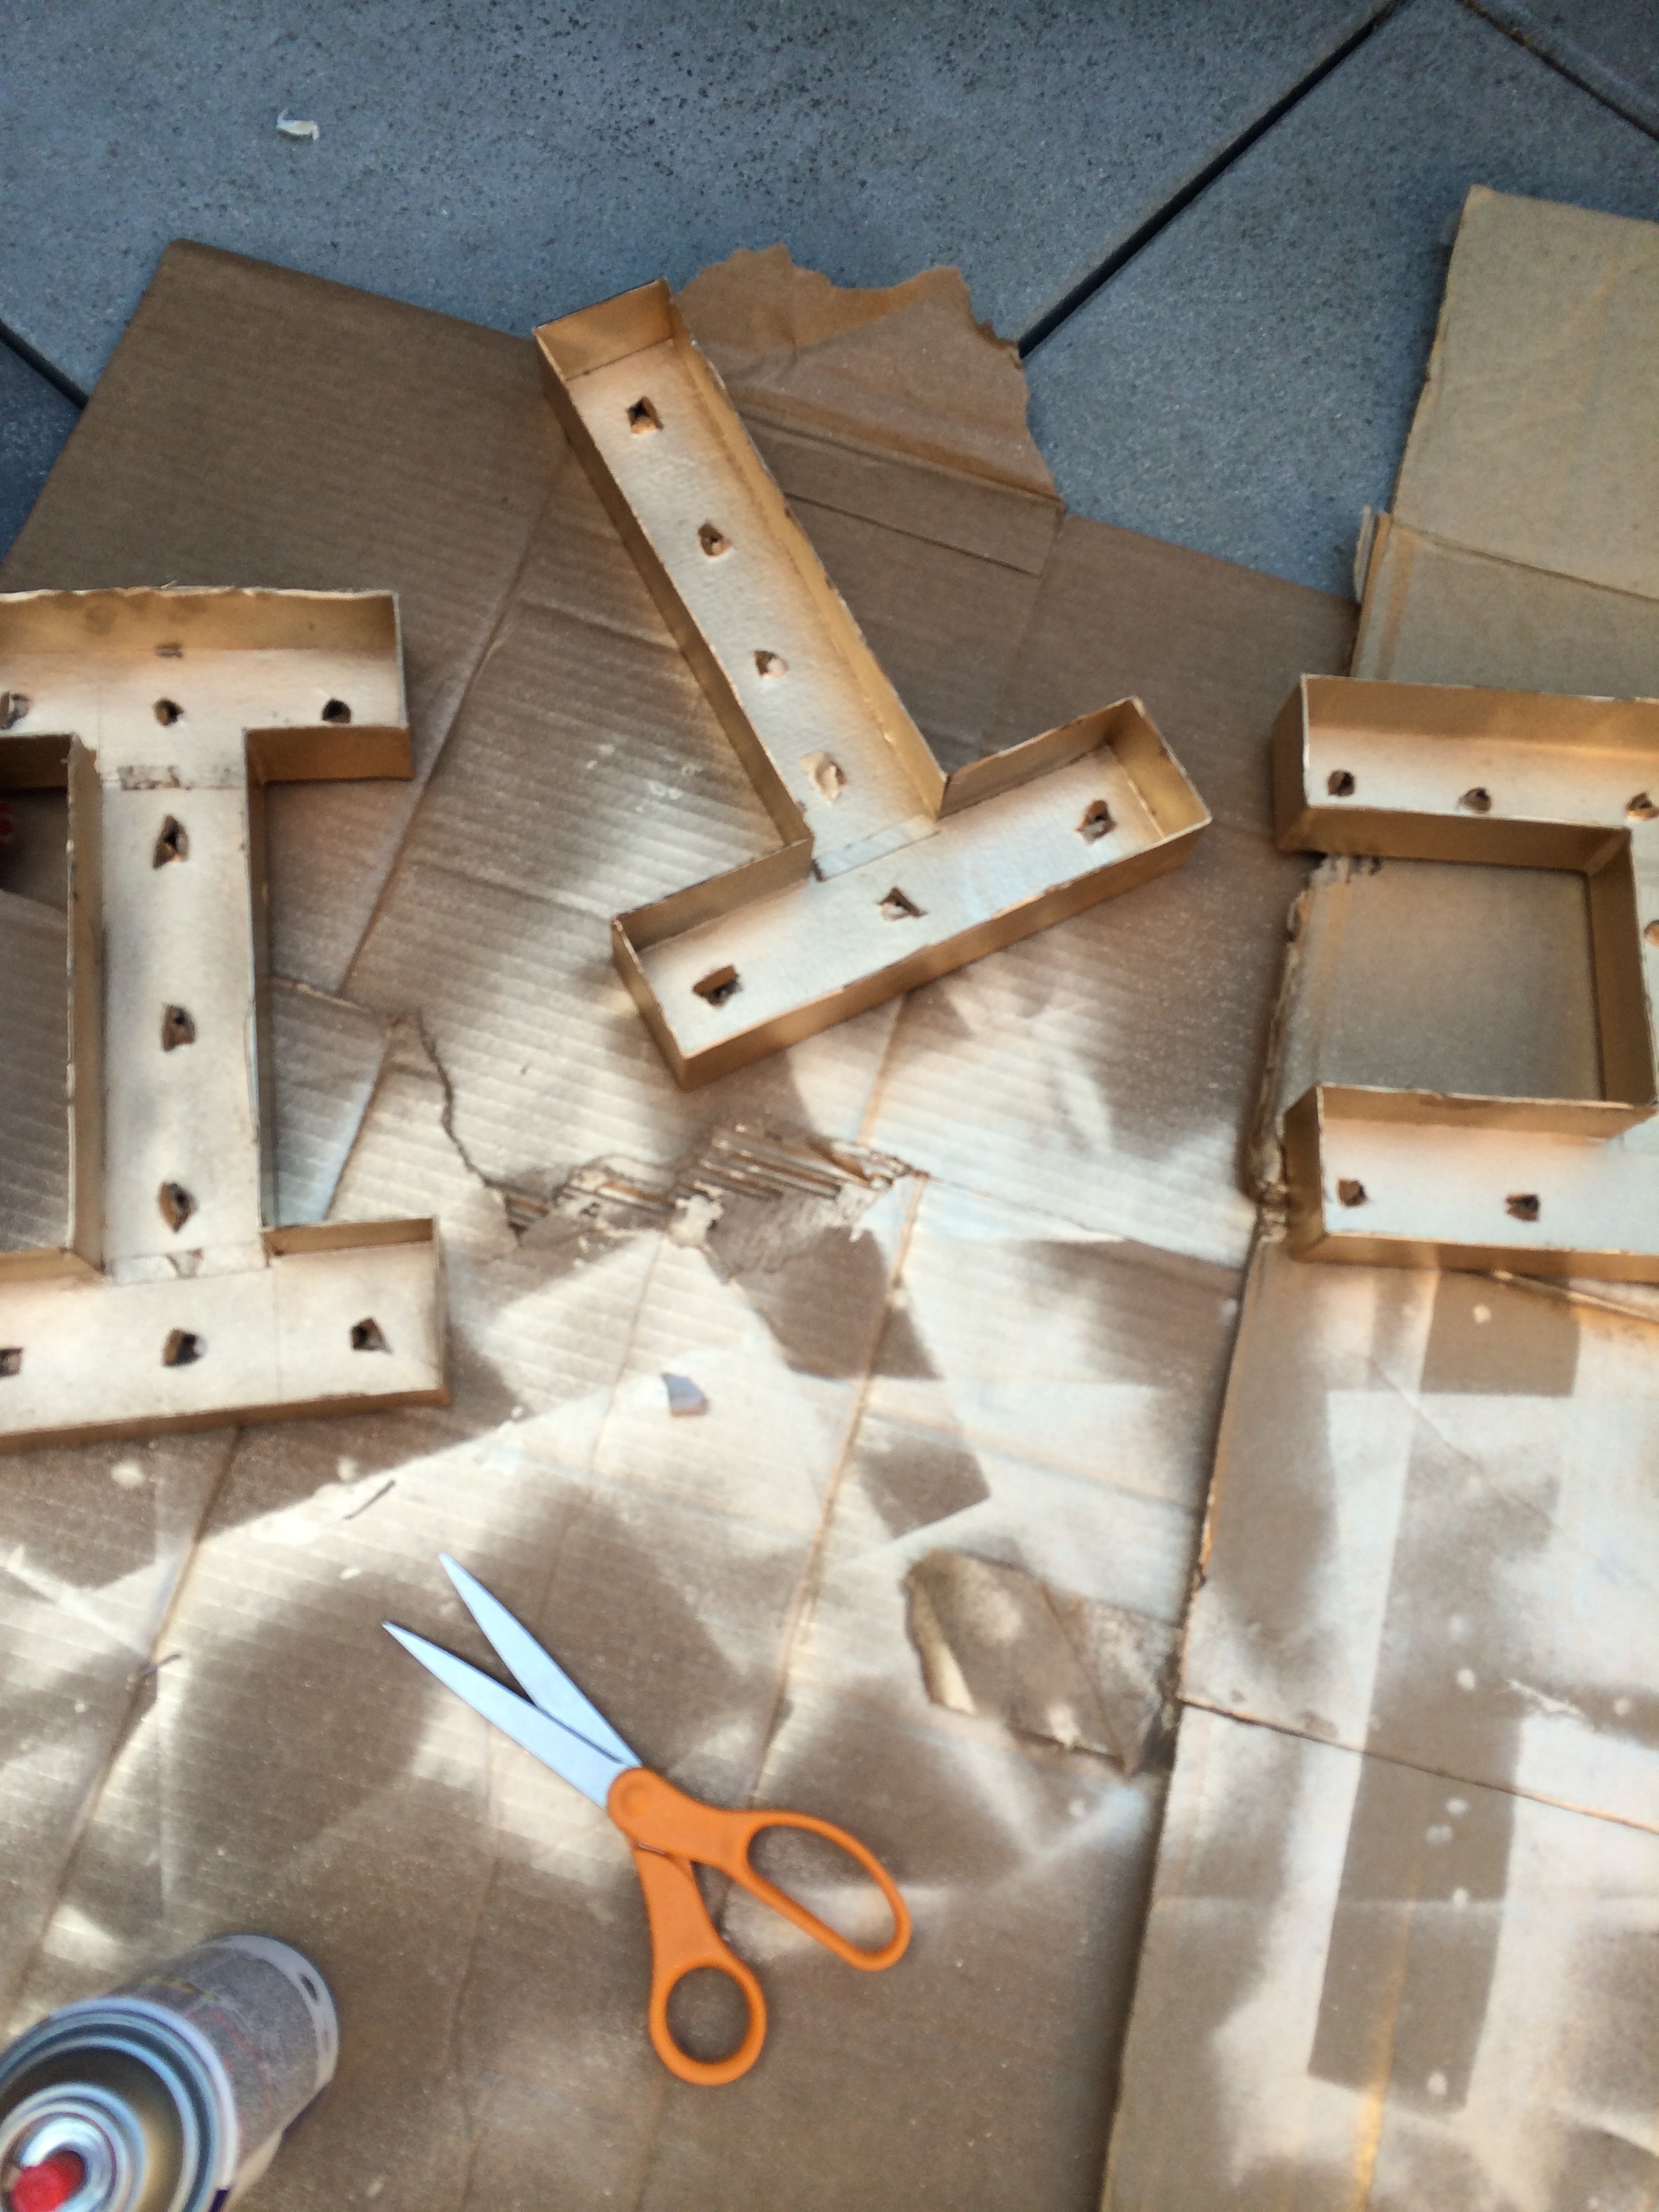 Next step is spray paint! Head to a rooftop, backyard, or other well-ventilated space to get your spray paint on. We recommend laying a cardboard down to protect your work area. Flip the letters so the hollow side is facing up and apply your spray paint in 3 coats to get a nice solid color. Let it dry for 10 minutes between each layer.
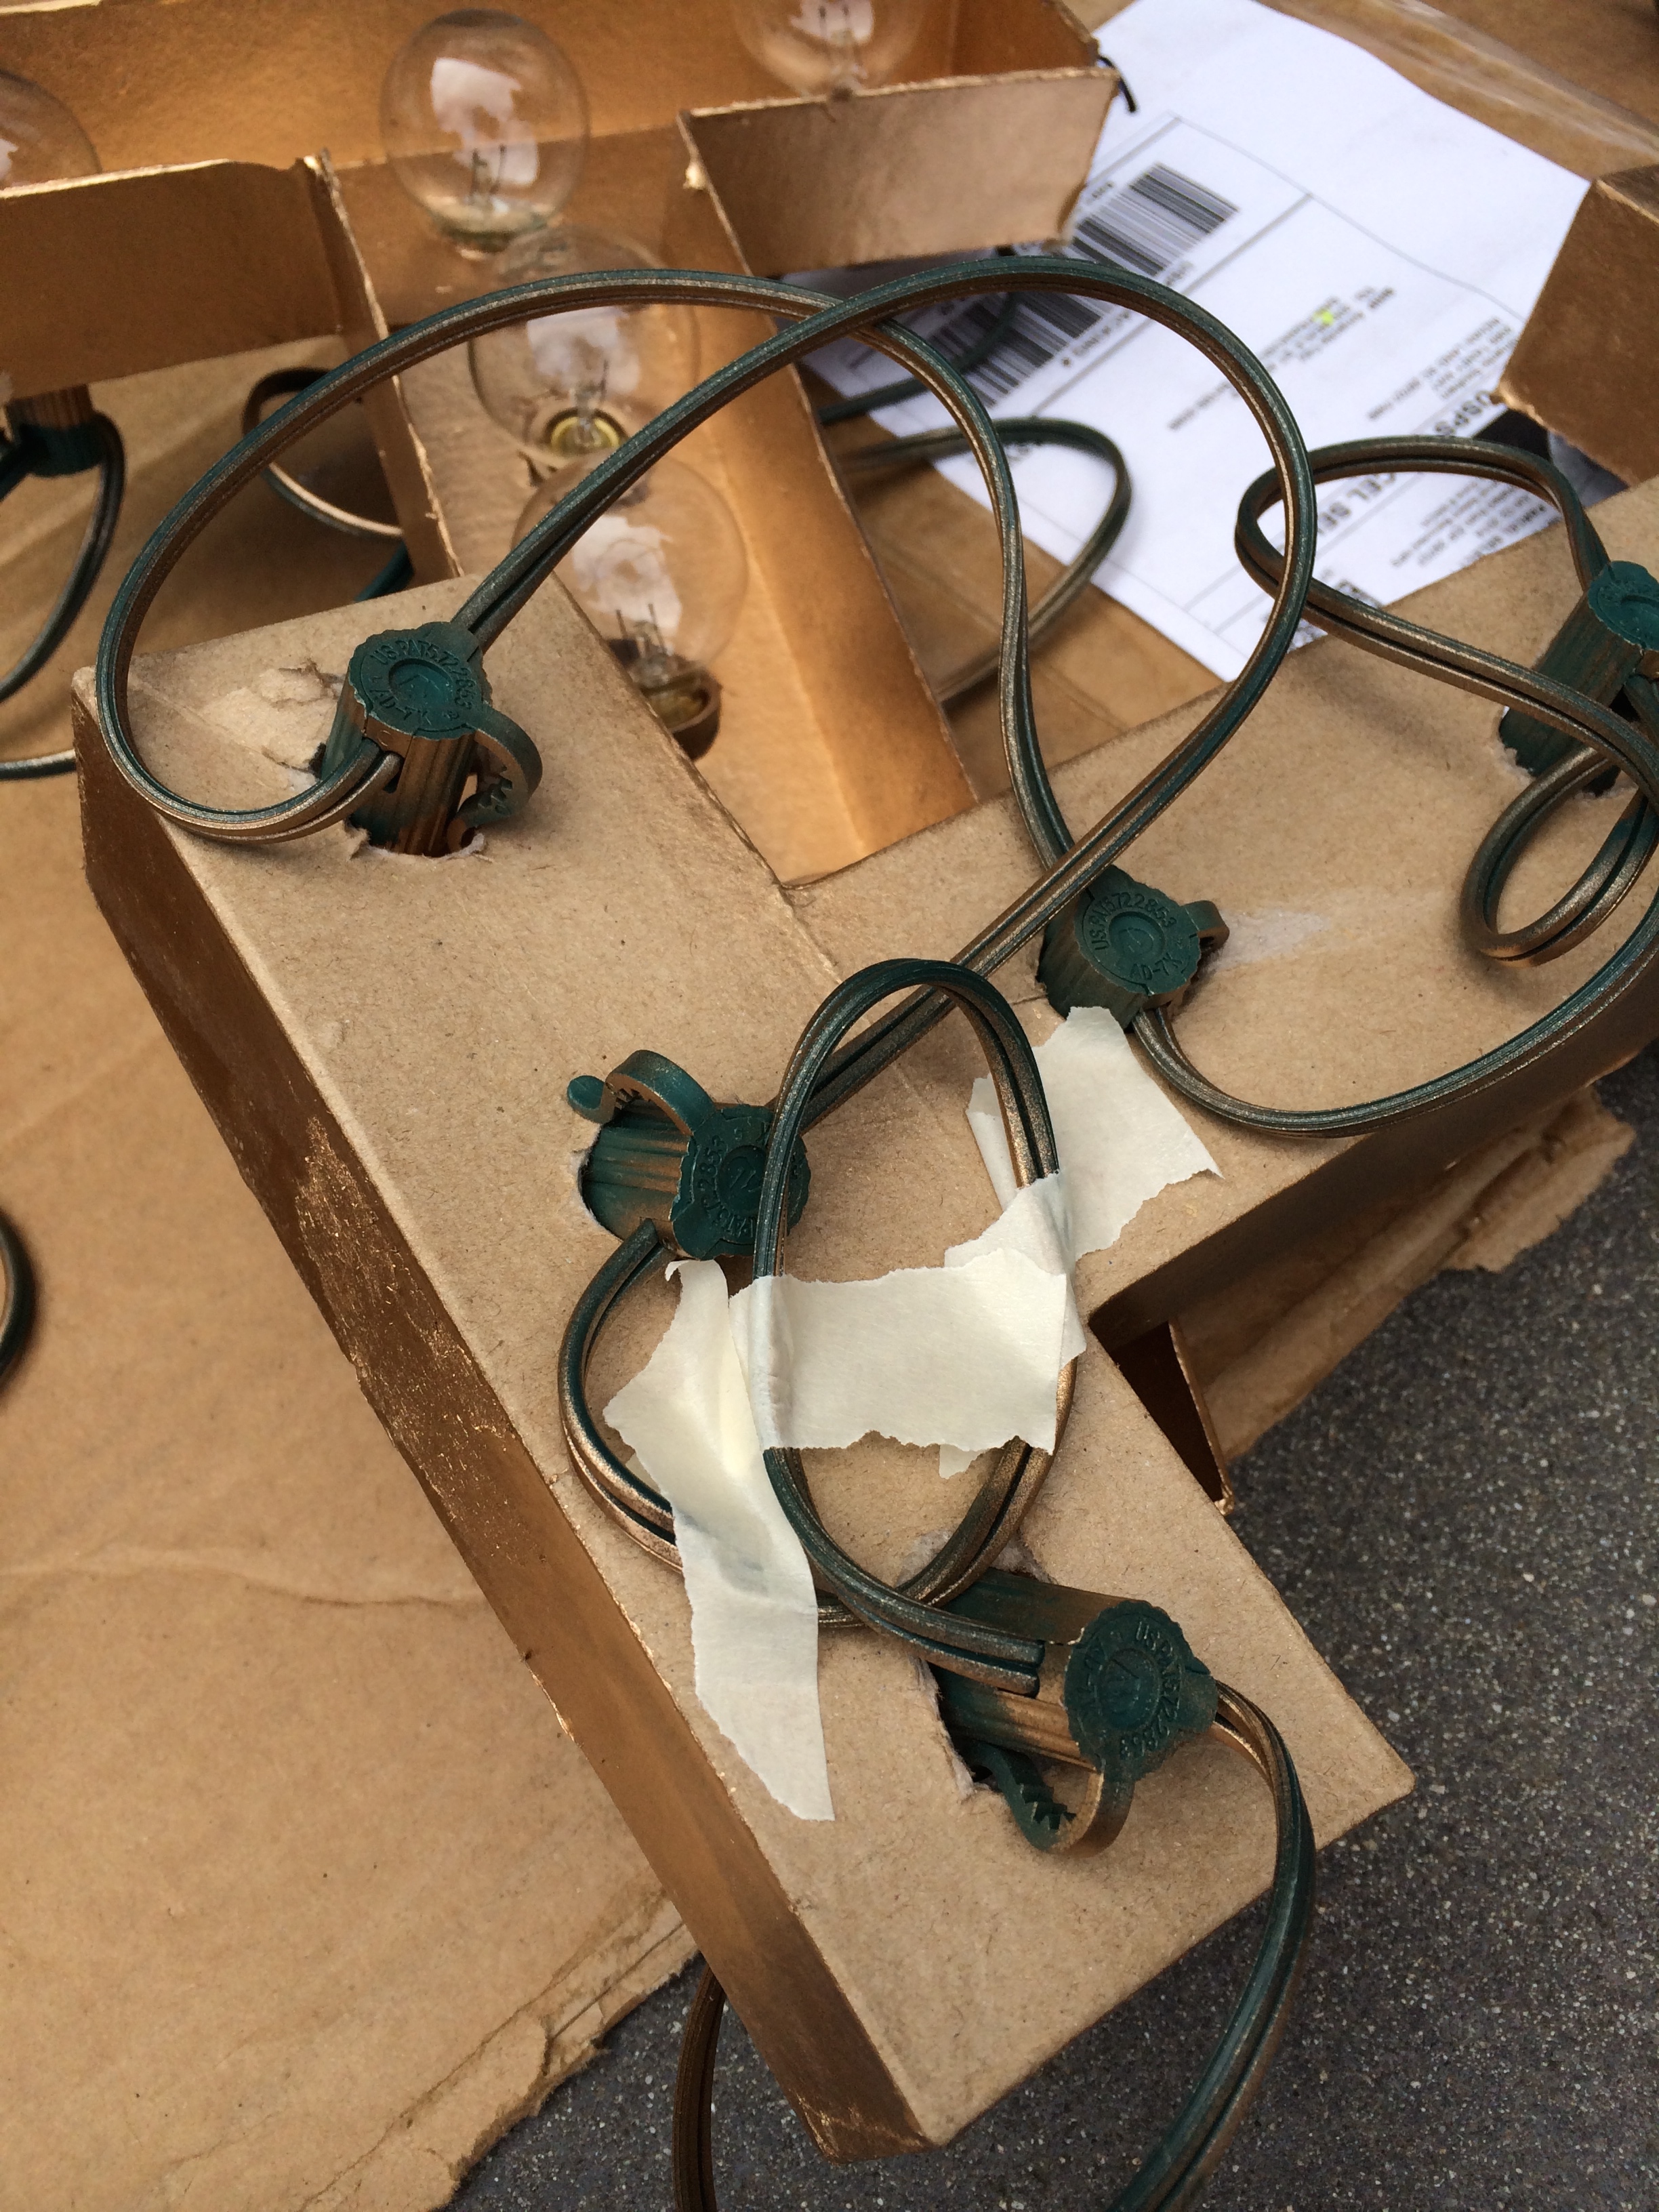
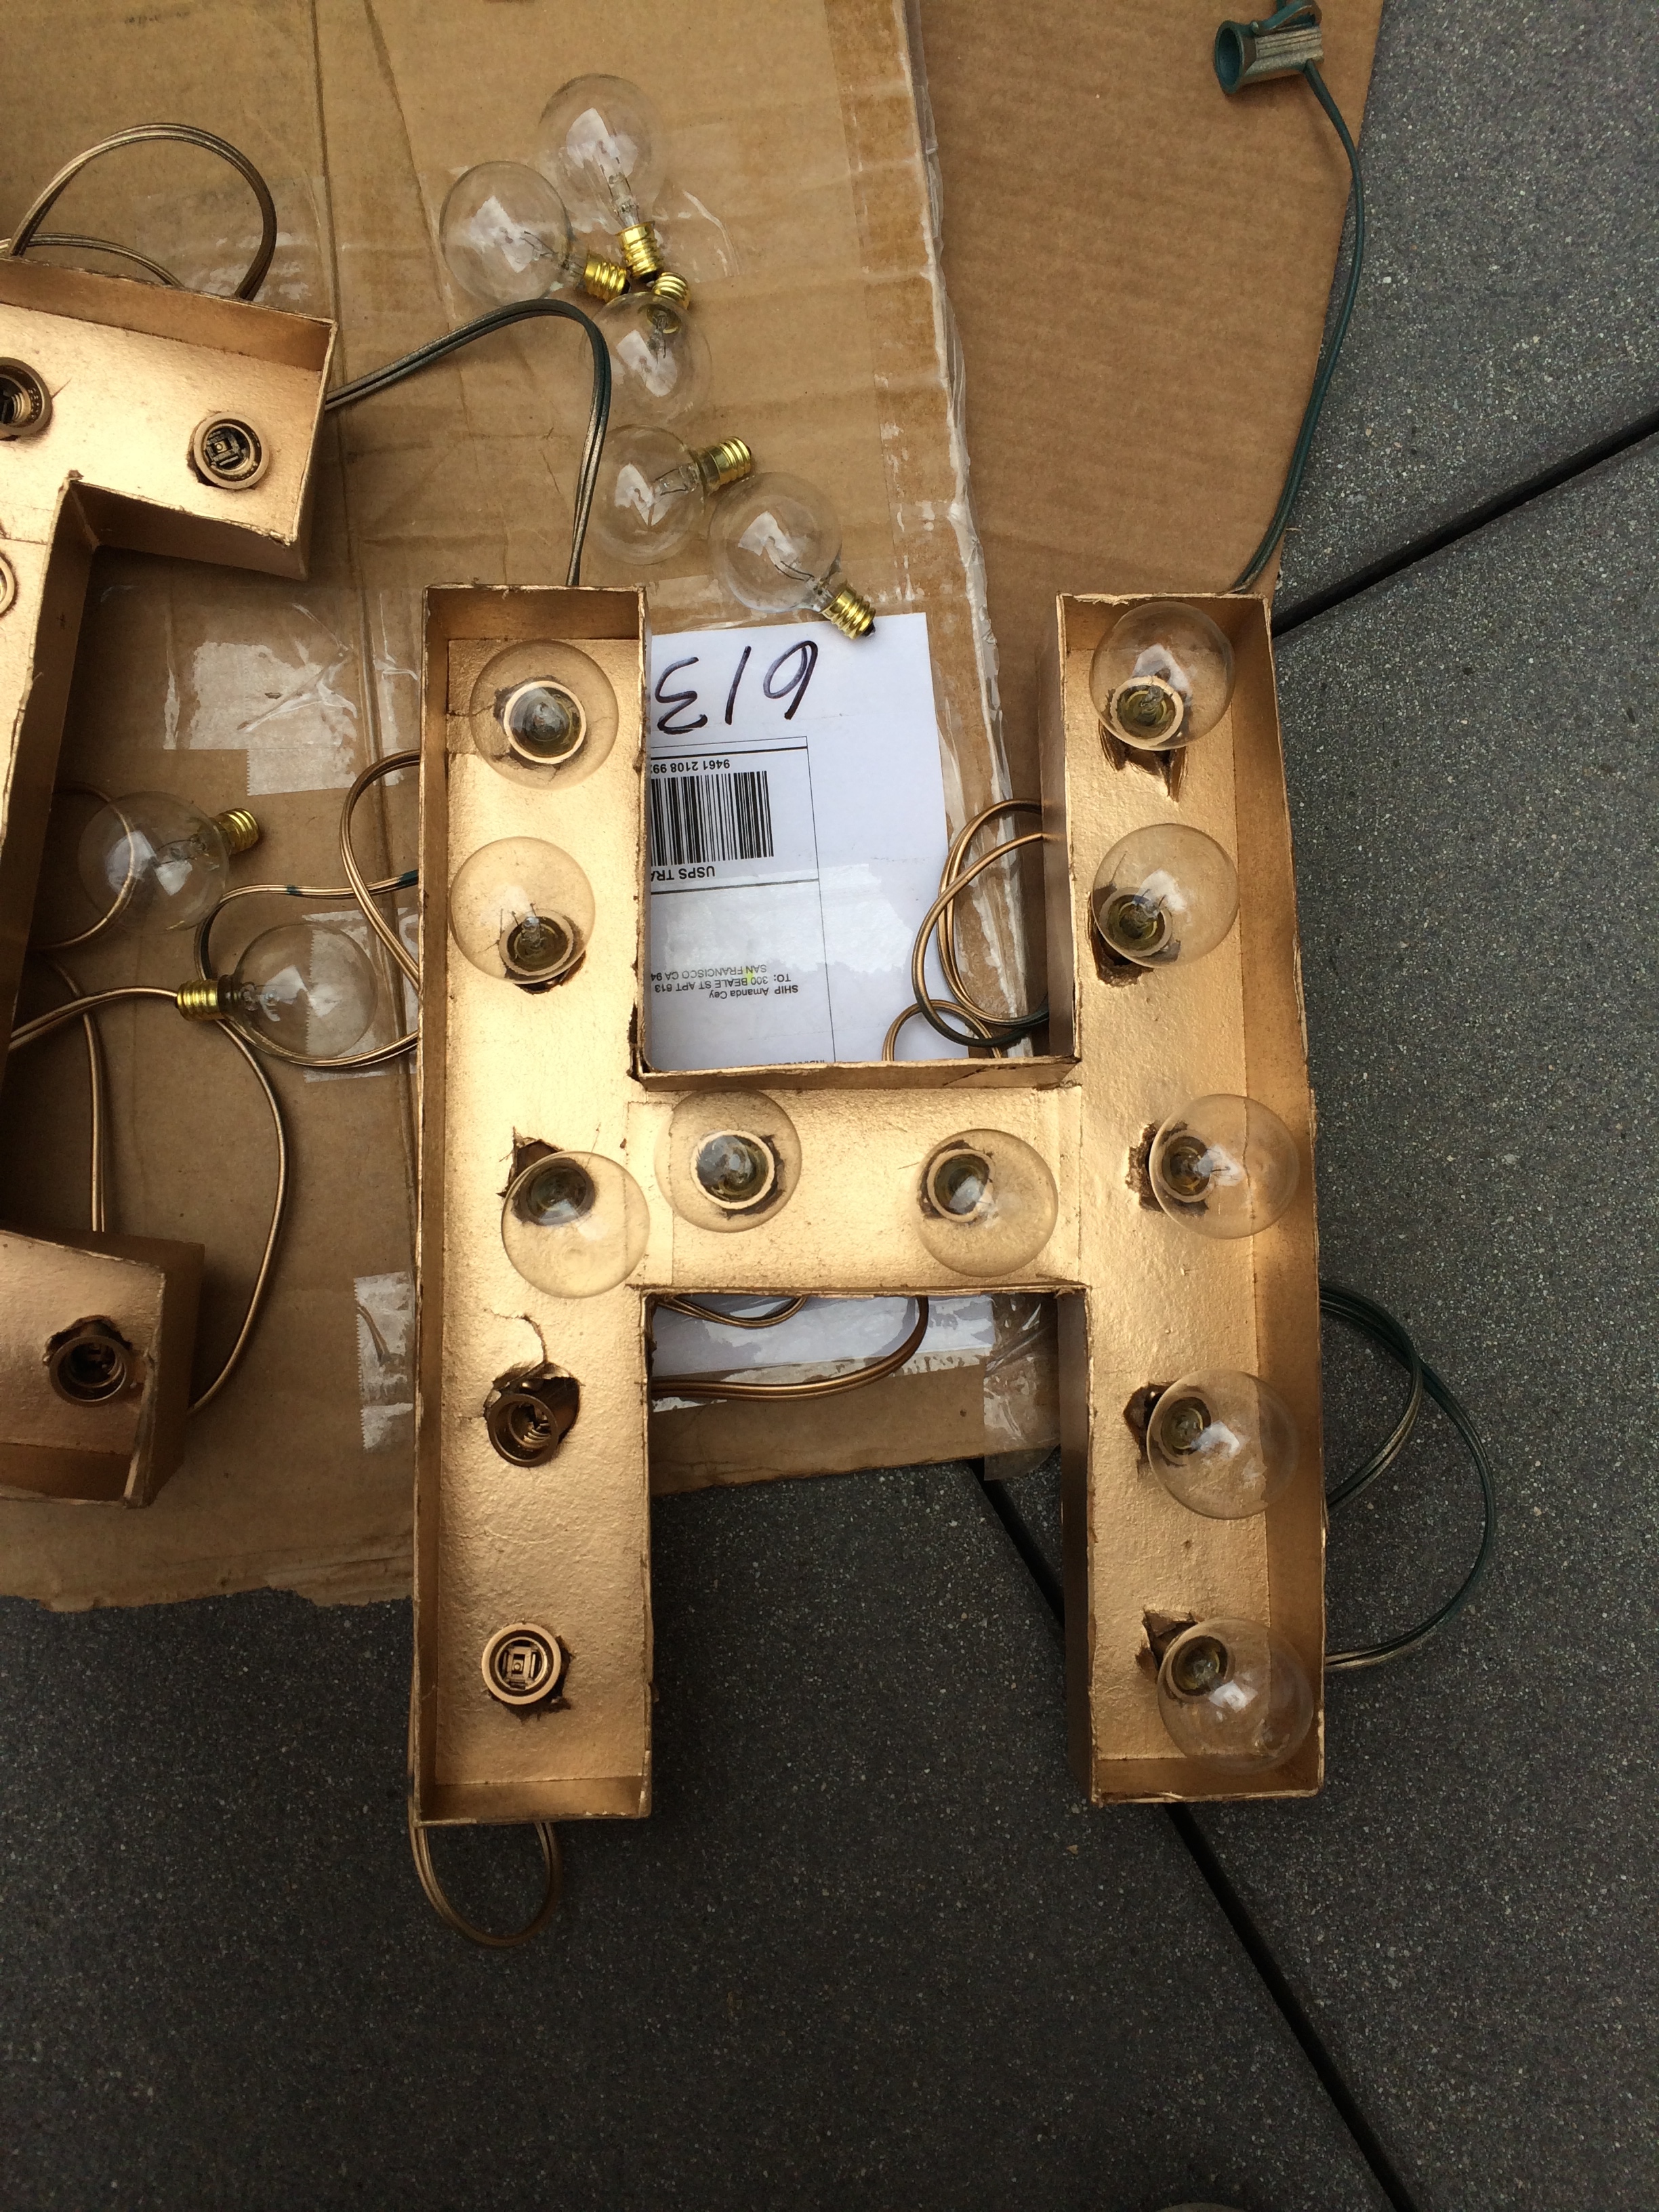 While the letters are drying, unscrew all the bulbs from the string. Then when they’re dry, flip them upside down again and in reverse order. Start inserting the back of the light string from the side that you do not intend to plug into the wall (aka the “female” end). You may have to connect 2 or 3 strands together to spell out your whole word. Insert the back portion of the light strand into each hole, making sure to start and end each letter at the bottom.
 To hide those annoying wires, tape them down into place and secure with masking or duct tape so they won’t show when you flip the letters back over. If you don’t have time to do this step, you can skip it, but it really does help the letters look cleaner and more professional! Then, flip the letters over and screw in the bulbs. Now the moment you’ve been waiting for, plug them in and watch the letters be transformed!
What do you think of the light up marquee sign?! Will you be creating one for you next event? Let us know what you think in the comments below or on Facebook or Twitter!
DIY Event Decor & Gift Ideas
Summer is here and it’s time to DIY! The freedom to customize colors and create something all on your own is what we love most about crafting. This week, we’ve found five ideas that can be utilized as fun decor for events, or can be gifted to friends & family. The possibilities are endless with DIY projects, so channel your inner Martha Stewart and give these DIY’s a try!
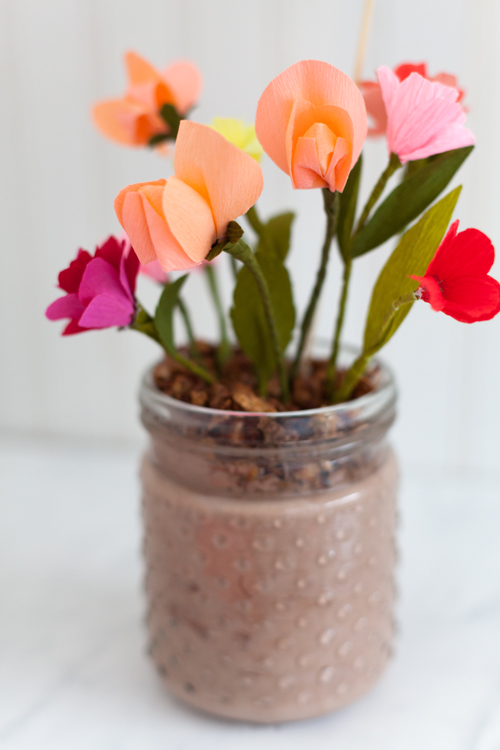 1. Edible Flower Pot: This DIY project allows you to essentially have your flowers and eat them too! All you will need to create this jar is colored paper to create the flowers, and the ingredients for the chocolate yogurt and granola. The chocolate yogurt is made up of 12 ounces greek yogurt, 1 tablespoon of cocoa powder, and ½ teaspoon of almond extract. To top it off, the chocolate granola ingredients is 1 cup granola, 1/2 tablespoon of coconut oil, 2 teaspoon of cocoa powder, ⅛ cup of chopped almonds, and ⅛ cup of coconut. This delicious idea was found on The House That Lars Built and can be used as a name card at parties or given as a gift to those with a sweet tooth!
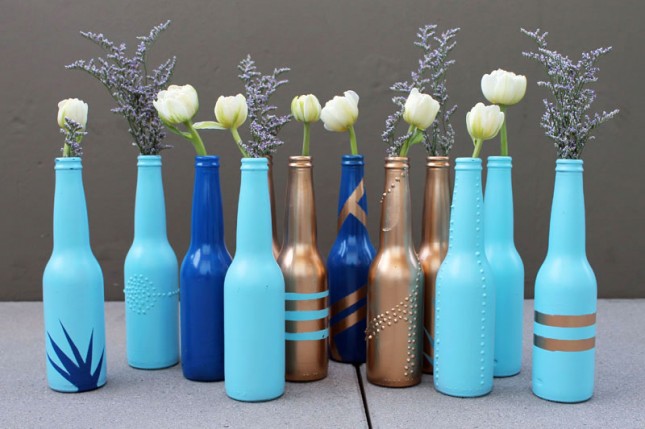 2. Beer Bottle Vases: This colorful project was discovered on Brit + Co and puts an awesome twist on the ordinary flower vase! After peeling off the labels of the bottle, you will need spray paint (colors of your choice!), painter’s tape, and puff paint. Grab the tape to start creating designs and voila! Puff paint can be used to create dotted designs that pop out from the bottle. Make sure to let dry for about 30 minutes before spray painting. The finished product makes a beautiful vase for centerpieces or the perfect housewarming gift!
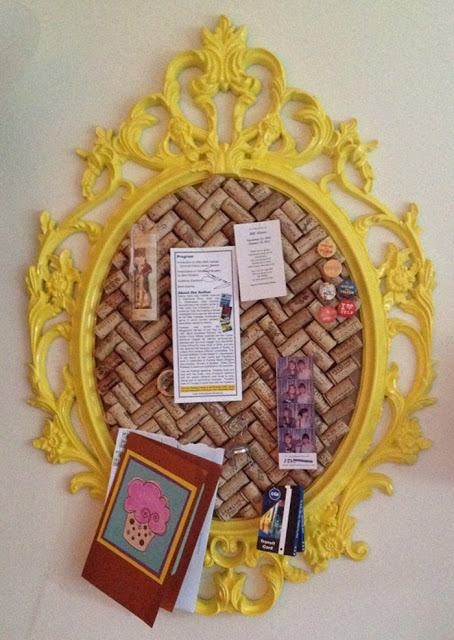 3. Chevron Cork Board: Wine corks have a great amount of versatility when it comes to DIY projects, so save them up! This project found on IKEA Hackers is a fun way to display pictures or information at an event. After gathering corks, you will need a drill frame, spray paint, foam core, cardboard, and a glue gun. Remove the glass and cut a piece of foam core to fit behind the cardboard oval. Prime and paint the frame with spray paint, then lay out the chevron pattern on cardboard. Using a hot glue gun, glue the corks in pattern and hang it up for display!
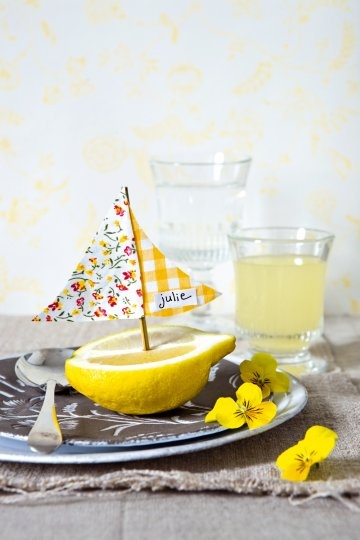 4. Lemon Boat Name Card: With it being summer right now, we couldn’t help but include these adorable name cards in our top picks for DIY projects! You will needs lemons (obviously!), toothpicks, and two types of printed paper to complete the sail boat. Cut the paper into curved half triangles and glue them to both sides of the tooth pick. Your guests are guaranteed to be impressed by your creation! This idea was found on Delightful Projects.
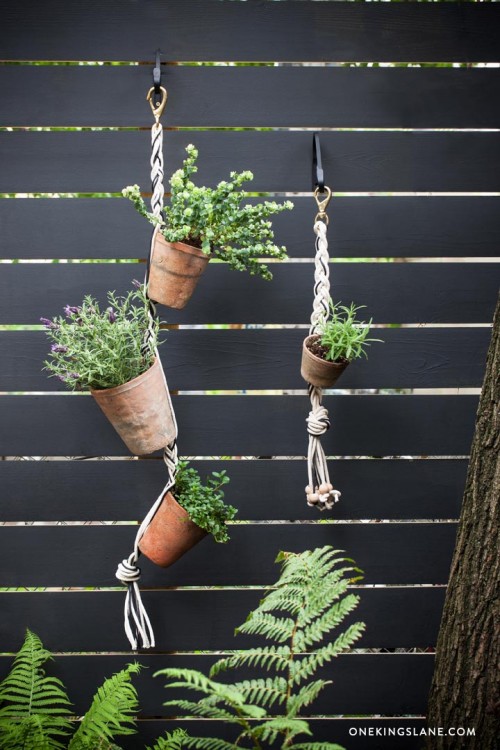 5. Hanging Garden: Ring in summer with this simple DIY hanging planter to add a splash of green indoors or outdoors! The step-by-step guide to this project was found on Design Sponge. To create the hanging garden you will need 2 square terra-cotta pots, 1 bundle of cotton clothesline cord (50 feet), 1 bundle of green cotton venetian-blind cord, 1 brass snap hook, and 8 to 16 wooden beads. Thread the clothesline and green cord through the snap hook and feed your cords through the draining holes in the pots. Flip the pot over and repeat the steps to add the second pot. Gather the excess rope and knot it at the bottom. Attach the beads to each cord, knotting below to secure in place. Once the pots are hanging, add your plants and display your vertical garden!
Will you be trying any of these DIY projects? Let us know your favorite one and share pictures of your completed creation with us in the comments below or on Facebook and Twitter!